General information
You can build your own WarGears on our build server. To start it, enter [/build] . A menu with various settings then opens.
Administration
At the top left of the menu (opened with the command [/build] open) you can start your build server and then enter it. Your current status is displayed in the centre (whether your server is switched on). To stop the server, click on the "Stop" icon in the top right-hand corner.
Adding players
To add a player to your build server, click on "Add player" at the bottom left. Another menu will now open in which all players who are on the build server are displayed. At the bottom left there is also a "Nametag" with which you can add players who are not currently on the build server. Before you have added the player completely, a window will open in which you can adjust the various rights of the player (WorldEdit rights, PlotControl and build rights, etc.). You can of course change these at any time.
It is also possible to limit the time a player is added to your server. This time can be adjusted as required in the menu.
To activate the settings, click on "Confirm" at the bottom right.
You can adjust the rights of the players afterwards by [/build] and click on the corresponding player.
How can I join another build server?
To see which build servers you are currently added to, enter [/build list] in. Alternatively, you can also click on the "Build list" in the menu ([/build]). You can then left-click to start or join the selected server.
Dummies
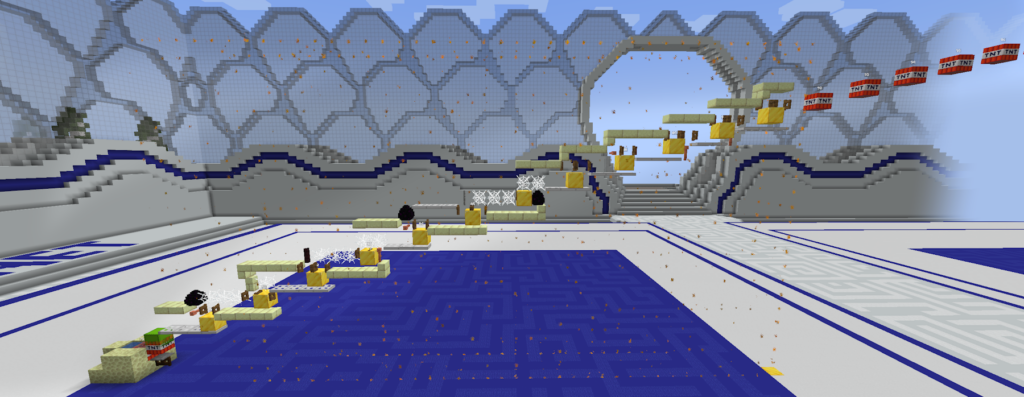
Dummies can be pasted on our build server. You can use them to test what damage a cannon does and where it hits. There are dummies of different sizes and also dummies with various shields.
Paste dummies
To paste a dummy, call up the GUI menu (Netherstern or [/gui]). Then click on the wool block, now you are in the dummy menu. There are various settings here, you can select the size (Tier I, Tier II, Tier III), the direction (north or south) and whether the dummy should have shields. You can also choose whether you want to paste a "standard dummy" or a customised dummy (must be created beforehand). As soon as you have set everything, click on the green button and the dummy will be pasted. If you have accidentally pasted it incorrectly and, for example, destroyed one of your cannons, you can use the command [/undo] undo this again.
Creating a customised dummy
You can also create individual dummies on our build server. As soon as a dummy has been completed, open the dummy menu. Click on the wooden axe (top right) to mark an area of the plot (particle). Everything within this particle is saved as a dummy. After confirming the saving in the chat, a window opens in which you can specify the name for the dummy. After saving, you can paste individual dummies via the dummy menu.
Managing the dummies
You can manage your own dummies in the dummy menu (forge table). Here you can specify the name of each of your own dummies, select which size (Tier I, Tier II, Tier III) it has and whether it should have shields.
Dummy editor
You can customise the dummy in the dummy editor. Here you can select which type of sign the dummy should have on a particular side. You can then display or save the dummy.
Cannon simulator
The cannon simulator is a helpful tool that allows you to build cannons with the optimum propellant, number of projectiles and firing phase. For example, if you want to build a 2 tick stab cannon, you can simulate and test this cannon beforehand. This makes it possible to develop a perfect cannon without having built it beforehand.
The tool consists of two items in the "GUI menu". One is the cannon simulator block (shulker box) and the cannon simulator tool (clock). The cannon simulator block represents the position where the TNT is to be spawned. The tool allows you to start the simulation.
Creating a cannon simulator block
The first step is to drag the block from the "GUI menu" into the inventory. Then place this block where you want your drift/projectiles to appear. After placing the shulker box, a new menu will open.
Then press the plus button in the centre. Arrows will then appear pointing upwards and downwards, as well as a display showing the current amount of TNT.
The TNT shows you the number of TNTs for the selected tick. Please note that the tick number refers to the game ticks! (2 game ticks = 1 redstone tick)
The paper shows you the current ticks at which the TNTs ignite. (Ticks go up to 100 ticks. However, the paper only displays a maximum of 64)
You can use the arrows to increase the number of ticks and TNT.
Settings
There are 2 different settings. One is the global settings and the other is the tick settings.
Global settings can be opened via the "Settings" icon at the top right of the GUI. The jumping behaviour (on/off) and a shift to x, to y and to z can be entered (minimum -5, maximum 5). The global settings apply to all ticks that do not have individual settings. The global settings can be found at the top right of the gun simulator blocks.
Tick settings can be opened by clicking on the TNT in the tick. This can be set in the same way as the global settings.
This setting overwrites the global setting.
The tool - the clock
You can use the clock to control the shulker boxes. It allows you to activate/deactivate the cannon simulator and also copy and paste it.
To start, press "right-click" with the clock in your hand. The set TNT will then spawn. After firing, the Shulker crates will spawn again for setting.
To copy, press "Shift" and "Right-click" on the Shulker box while holding the clock in your hand. This saves the cannon timer block.
To paste, you must first copy a cannon timer block. Then you can copy the cannon simulator block to the target Shulker box using "Shift" and "left-click".
The cannon simulator is linked to the individual plots of land. This means that several players can work with this feature at the same time.
Trail
With the trail plugin you can follow the calculation of TNT.
To start the trail plugin, click on the Nether star when you are on your building plot. You will now see the "Trail GUI" at the top left, which opens an overview with which you can control the plugin. Here you can start a recording, stop a recording, change the particle colour, display the recorded trail and hide it again.
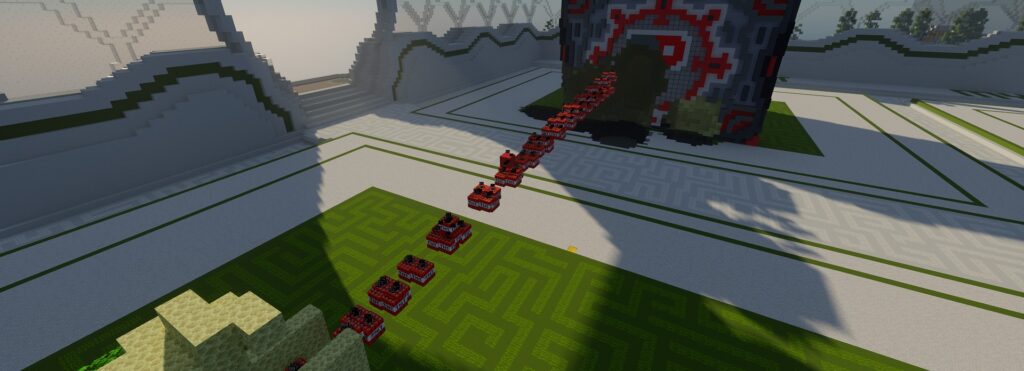
When you start a shot, you then shoot with your cannon. The plugin records the shot and then automatically shows you the result as soon as the shot is complete. Explosion points are displayed as red glass. The number(s) above the TNT indicate the number of ticks that were at the point where the TNT was located.
This can of course also be done using commands, which can also be used to configure the plugin settings more precisely. Here is a brief overview:
[/trail new] - starts a recording.
[/trail settings toggleAutoShow] - Changes the auto display setting
To make your trail disappear again, you must either wait 30 seconds or use the command [/trail hide] (hides the trail).
For more options to customise the Display you can use the command [/trail show ] use.
<mode> - Display mode settings:
"normal": All calculation points are displayed.
"no_explosion": All calculation points except the explosion points are displayed.
"only_explosion": Only calculation points are displayed.
"particle": No TNT but particles are displayed.
"tiny_particle": No TNT but TINY particles are displayed.
"phase": The calculation points are indicated by particles which are coloured according to the ignition phase.
If no mode is specified, the last mode used will be used.
<startTick> - Defines from which start tick TNT should be displayed (optional)
<length> - Defines the number of ticks to be displayed (optional)
Detailed information on the individual calculation points:
To obtain detailed information on a specific calculation point/TNT, you must right-click on it in the displayed trail. However, this only works if there is a single TNT at the point.
To display a single TNT, you can click on "TNT-Id" in the TNT information, or alternatively enter the following command:
[/trail history ]
<TNT-Id> - Represents the ID of the TNT to be displayed (TNT ID).
The trail history can also be displayed by double right-clicking on the corresponding TNT.
Region selection
[/trail selection make sphere ] Selects all TNT in the .
[/trail selection make WE] Selects the current Worldedit selection.
[/trail selection details ] Displays all local details of a TNT in the selection.
[/trail selection toggleHighlighted] Displays the selected region.
[/trail selection list shown] Lists the TNTs displayed that are in the selection.
[/trail selection list total] Lists all TNTs that are in the selection (including those not displayed).
[/trail selection remove] Deletes the selection again.
Trail memory
Recorded trails can be saved until the build server is shut down. This is done automatically by default after the trail has been recorded, but can be activated using [/trail settings toggleAutoStore] can be deactivated. The current trail can be manually selected with [/trail storage addCurrent NAME] and a name can also be specified.
[/trail storage list] gives you the list of saved trails and allows you to load them ([/trail storage load NAME]) and to delete ([/trail storage remove NAME]).

Run builder
This tool allows you to construct a run within a trail region. To do this, you must first select a region as explained under "Region selection".
Depending on the application, it may be useful to generate a run from several trails simultaneously, for example for different modes or with highly scattering guns. With the command /trail barrel listTrails you can list the trails used for the run builder and manage them.

The current trail is marked with "current".
The run can finally be completed with [/trail barrel build] are generated in the marked region with the selected trails.
Schematics
Everything you build on the build server and then save is saved as a "schematic".
Creating a schematic
Once you have built a WarGear, you can save it as a schematic. To do this, first mark what you want to save. Use the wooden axe for this. If you left-click on a block (with the axe in your hand), the first point will be marked. If you click with the right mouse button (with the axe in your hand) on another block, the second point is marked. Everything between these points is now marked.
Now stand on the gold block in front of your WarGear. Look away from your WarGear and you will see a red "N" or a red "S" in the centre of your screen.
Now enter the command [/schematic save NAME] on. The direction of the schematic is determined automatically when the schematic type is changed (see below).
Your schematic is now saved in your schematic list. To call it up, enter the command [/schematic list].
Here you can manage, delete, etc. all your schematics.
Release Schematics

To be able to fight with your WarGear, you must have the corresponding schematic released.
To do this, enter the command [/schematic list] in the field. Then select the relevant schematic.
Now it says "Type: SCHEMATIC", click on it and change the type to the corresponding tier (Tier 1, Tier 2, Tier 3, Tier 3 without SFA).
Your schematic will then be checked by a member of the server team and, if everything conforms to the rules, released.
If your WarGear does not comply with the rules, it will also be displayed here.
Tick Rate Manager
The Tickrate Manager on our build server is a useful feature that allows you to build very complex cannons and experiment with the "ticks".
You can use this to manipulate the time on your build server.
With the command [/tick reset] all modifications to this feature are deactivated and reset to the original state.
Freeze/pause time and continue running
With the command [/tick freeze] freezes the time on your entire build server. In addition, a "boss bar" appears with this command. The blue colour, as shown in the image, indicates that time is frozen.

The command [/tick step ticks] the time continues to run for a certain number of ticks, after which it is stopped again. The specified number of ticks is saved, so the process can be repeated as often as required by entering the command again, or the command [/tick warp] used.
For example, the command [/tick step 100] following Bossbar:

After the 100 ticks have elapsed, the boss bar turns blue again and the time is stopped. Here you can also see that the number of ticks is still saved and you can add more [/tick step] and [/tick warp] Execute commands.

If, for example, the command [/tick step 100] is entered, counting continues from the last level reached until 200 ticks have been reached (100 ticks of the first command + 100 ticks of the second command).

Speed up and slow down time
The command [/tick rate TPS] speeds up or slows down the time on the plot. A tick count must be specified for this (between 1 and 60). The default (20) is set with the command [/tick rate] restored. Here is an example with a tick rate of 15:

Accelerate the time for a specific period
With the command [/tick warp ticks] you can continue to run the time for ticks at maximum speed for a certain time (e.g. 1000). The time is then stopped again and the server tick rate is reset to its original value.

Combination of different functions
Various functions can also be combined, e.g. here:

The blue colour indicates that the server is currently frozen. In addition, the server is frozen when executing a [/tick step] command with a tick rate of 14.4 (and was frozen in the process).
Difference between /tick warp and /tick step
The command [/tick step] always runs with the time specified by [/tick rate] specified tick rate. The time also freezes after the command has been executed.
[/tick warp] on the other hand uses the maximum server tick rate and the time only freezes here if the time was already frozen before the command was executed.
Building plugins
FAWE (FastAsyncWorldEdit)
This plugin includes all the functions of WorldEdit. It allows you to select regions and then copy, move, stack and perform many other actions.
(More)
HeadDB (HeadDatabase)
This database contains a huge number of player heads in all imaginable motifs and skins.
(More)
FAVS (FastAsyncVoxelSniper)
With FAVS it is possible to edit the world in various ways even from a great distance and to name the more than 100 commands would go beyond the scope of this article.
(More)
goBrush
With goBrush, a powerful brushing tool is available on our network. Although it usually shines in heavy term moulding, it can also be useful in other areas.
(More)
goPaint
With goPaint you can finally spray graphics onto your WarGears with ease.
(More)
Arceon
Arceon is a collection of various useful tools, such as ingame text, a colour or type replacer and much more.
(More)
Further functions
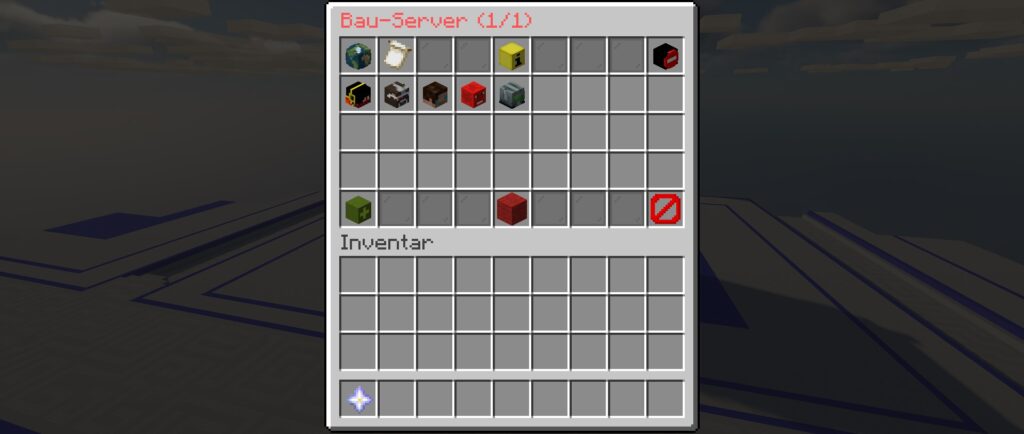
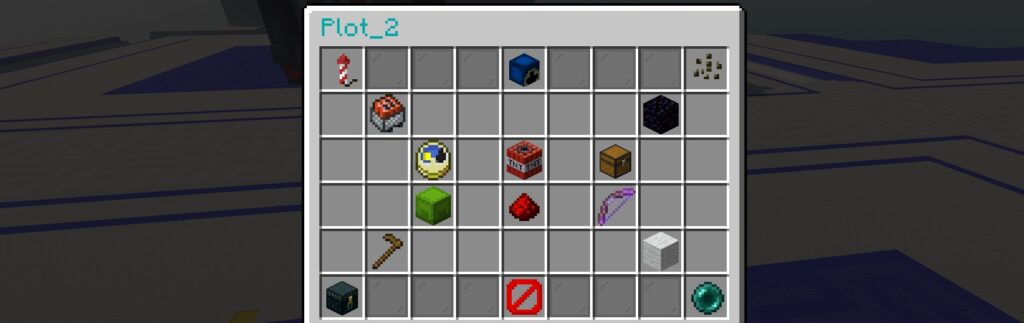
Our build server offers many different functions, which you can use with a Netherstar or the command [/gui] open. These features always relate to the property you are currently on. You can also use these functions on the other plots, but you have to set them separately for each plot.
Cannon reloader
This function allows you to load a cannon with just one mouse click. The TNT is copied into the cannon. However, for this function to work properly, the cannon must be switched off.
The cannon reloader looks like a TNT lore, which you can find in the "GUI menu". You have to drag the cannon reloader into your "hotbar".
Right-click to start the recording. The required TNT must then be set. To end the recording, press "Right-click" again.
As soon as you have saved TNT, you can have it placed automatically by "right-clicking".
To edit the saved TNT, press "Shift + right-click". This will place the TNT, start a new recording and you can edit the reload.
Left-click" to delete the saved TNT. However, this process must be confirmed in the chat with a mouse click.
Remote igniter
This is a tool that allows you to interact with levers, buttons or hooks from different positions and then trigger them. To select a lever, for example, you have to hit the lever with the pickaxe (from the "GUI menu"). However, this pickaxe must first be moved to your "hotbar". Your lever is then selected and you can activate and deactivate the lever by right-clicking on it.
You can also use the command [/trail settings toggleAutoStartOnRemoteDetonator] Set whether the trails should be displayed automatically when activated with the remote igniter.
Stoplag
This feature prevents any block and redstone physics. This makes it much easier to find errors and build complex shields, for example. With [/sl] you can activate this or deactivate it again afterwards. Alternatively, you can also set it in the "GUI menu" at the touch of a button.
TNT explosions
The command [/tnt] or alternatively in the "GUI menu" you can switch explosions on and off using TNT. This makes it possible to test cannons without them being destroyed immediately.
Scoreboard editor
The scoreboard can be customised. To customise the scoreboard, enter the command [/scoreboard editor] or [/gui editor] in. A window then opens in which the scoreboard can be customised.
Plot scan
With the command [/plot scan] you can have your plot scanned for forbidden blocks, items in crates, etc.
Block highlighter
With the command [/blockhighlighter] to open the following GUI, where you can select the blocks to be highlighted. The blocks can also be scanned through walls. You can also start and stop the block highlighter for the worldedit selection here.
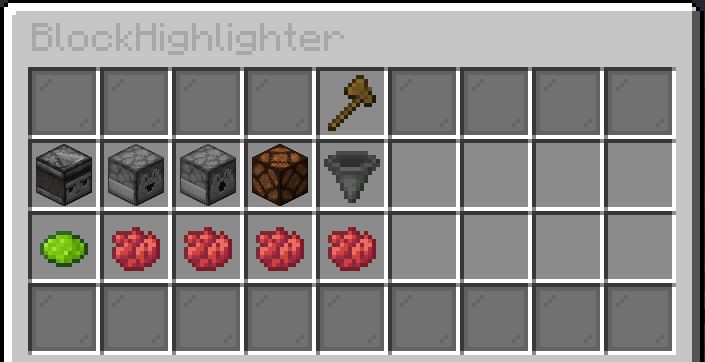
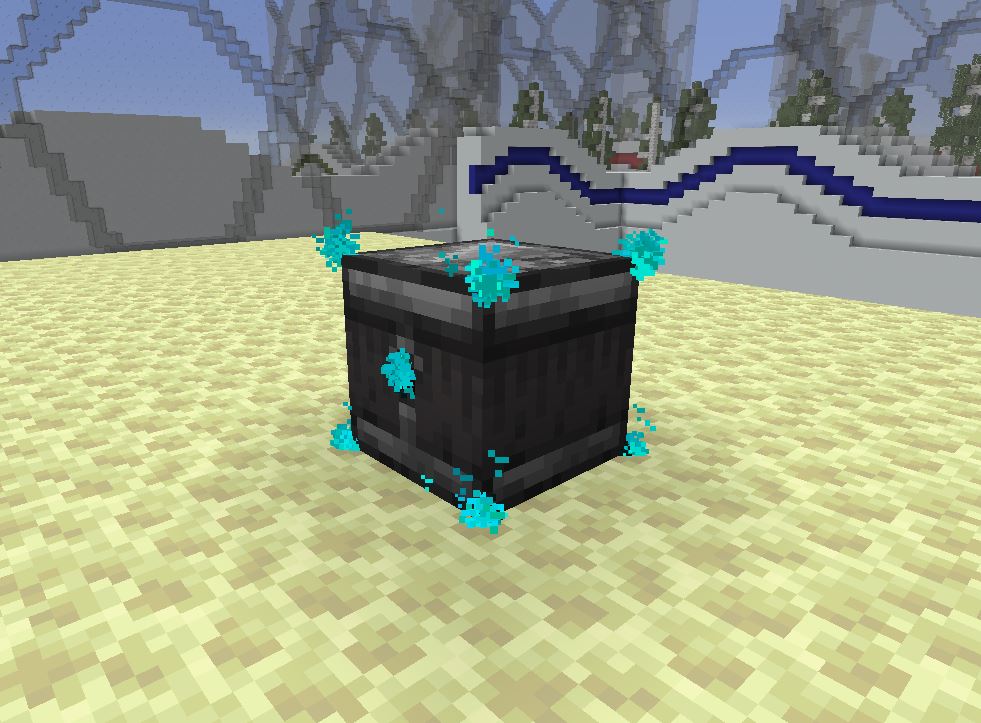
In the following two pictures you can see what the highlighted blocks look like. Note: Blocks that have one direction, like the Observer here, have 2 extra particles where the block is pointing!

Predictor
With the command [/pr] you can see a precalculated trajectory of the cannon simulators of the plot.